6. Reports
Reports in a social media campaign provide insights and analytics on the performance of your posts and overall campaign. These reports typically include data on reach, engagement, impressions, click-through rates, demographics of your audience, and more. By analyzing these reports, you can assess the effectiveness of your content strategy, understand your audience better, and make informed decisions to optimize future campaigns for better results.

If the user hasn’t created any posts yet, they have the option to generate customized reports based on various metrics and share them in different formats for easy access and analysis. To create a report, the user needs to click on the ‘Create’ button, which typically prompts a menu or form where they can specify the parameters and criteria for the report. This may include selecting a date range, choosing specific platforms or campaigns to analyze, and indicating the metrics they want to include, such as engagement, reach, impressions, click-through rates, and more.
Once the user has configured the report settings to their preferences, they can proceed to generate the report. Depending on the platform or tool used, the report may be generated instantly or may take some time to compile the data. After the report is generated, the user can review it to gain insights into their social media performance.
Reports can be shared in various formats, such as PDF, CSV, or through a dashboard interface. This allows users to easily distribute the report to stakeholders, team members, or clients for review and analysis. By providing detailed analytics and insights, customized reports enable users to assess the effectiveness of their social media strategies, identify areas for improvement, and make data-driven decisions to optimize future campaigns.
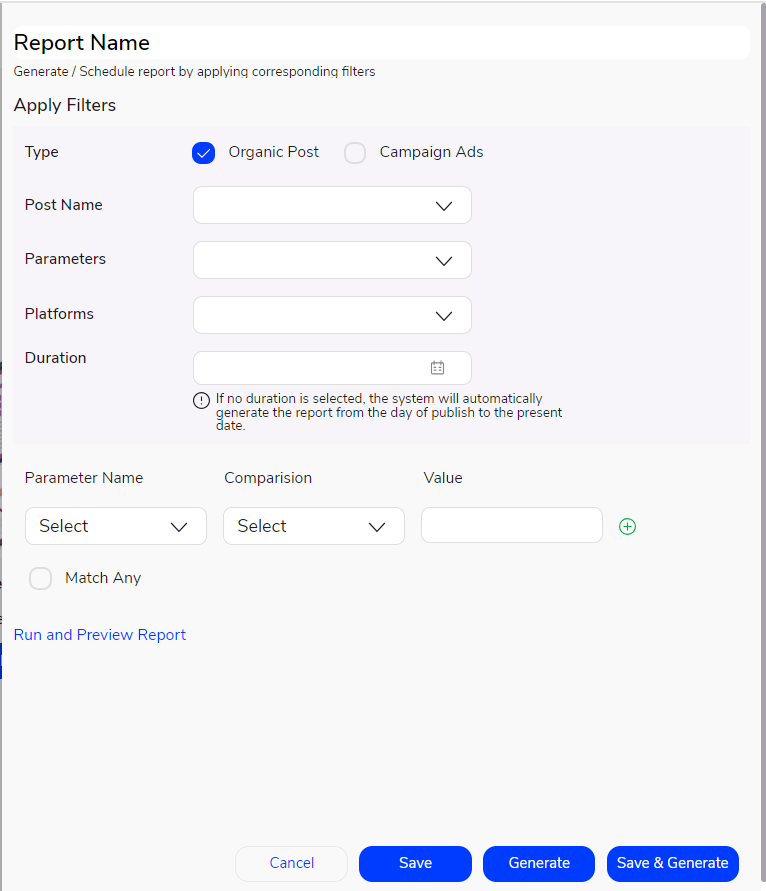
- Report Name:
This is where the user specifies a name for the report they are creating. It helps identify and organize reports for future reference.
- Generate/Schedule Report:
Users can choose to generate the report immediately or schedule it to run later. Scheduling allows for automated report generation at specified intervals, such as daily, weekly, or monthly.
- Apply Filters:
Users can apply filters to refine the data included in the report. Filters could include criteria such as date range, post type (organic post or campaign ads), specific post names, platforms (social media accounts), and more.
- Type:
This field allows users to specify whether they want to include data from organic posts or campaign ads in the report.
- Post Name:
Here, the user will see a list of the posts they have created. They can select specific posts to include in the report.
- Parameters:
Users can choose the metrics they want to include in the report. Metrics could include clicks, comments, likes, impressions, shares, users reached, unique users reached, and more.
- Platforms:
Users can select the social media accounts (platforms) they want to include in the report. This allows users to analyze performance across different platforms.
- Duration:
Users can specify the time for which they want to generate the report. Options typically include selecting a specific date range (e.g., today, yesterday, last week) or choosing ‘All time’. If no duration is selected, the system will automatically generate the report from the day of publishing the posts to the present date.
- Parameter Name, Comparison, and Value:
This section allows users to set specific conditions for the data included in the report. For example, they could specify that they only want to include posts with a certain number of likes or comments.
- Match Any:
This option allows users to specify whether all conditions must be met (‘Match All’) or if any of the conditions can be met (‘Match Any’) for the data to be included in the report.
- Buttons:
– Cancel: Allows users to cancel the report creation process and return to the previous screen without saving any changes.
– Save: Enables users to save the current settings and configurations for the report without generating it immediately.
– Generate: Triggers the immediate generation of the report based on the specified settings.
– Save and Generate: Saves the current settings and configurations for the report and then triggers its immediate generation.
We are located at

eReleGo Technologies Pvt Ltd
646, 52, 12th Main Rd,
2nd Block, Rajajinagar,
Bengaluru, Karnataka 560010