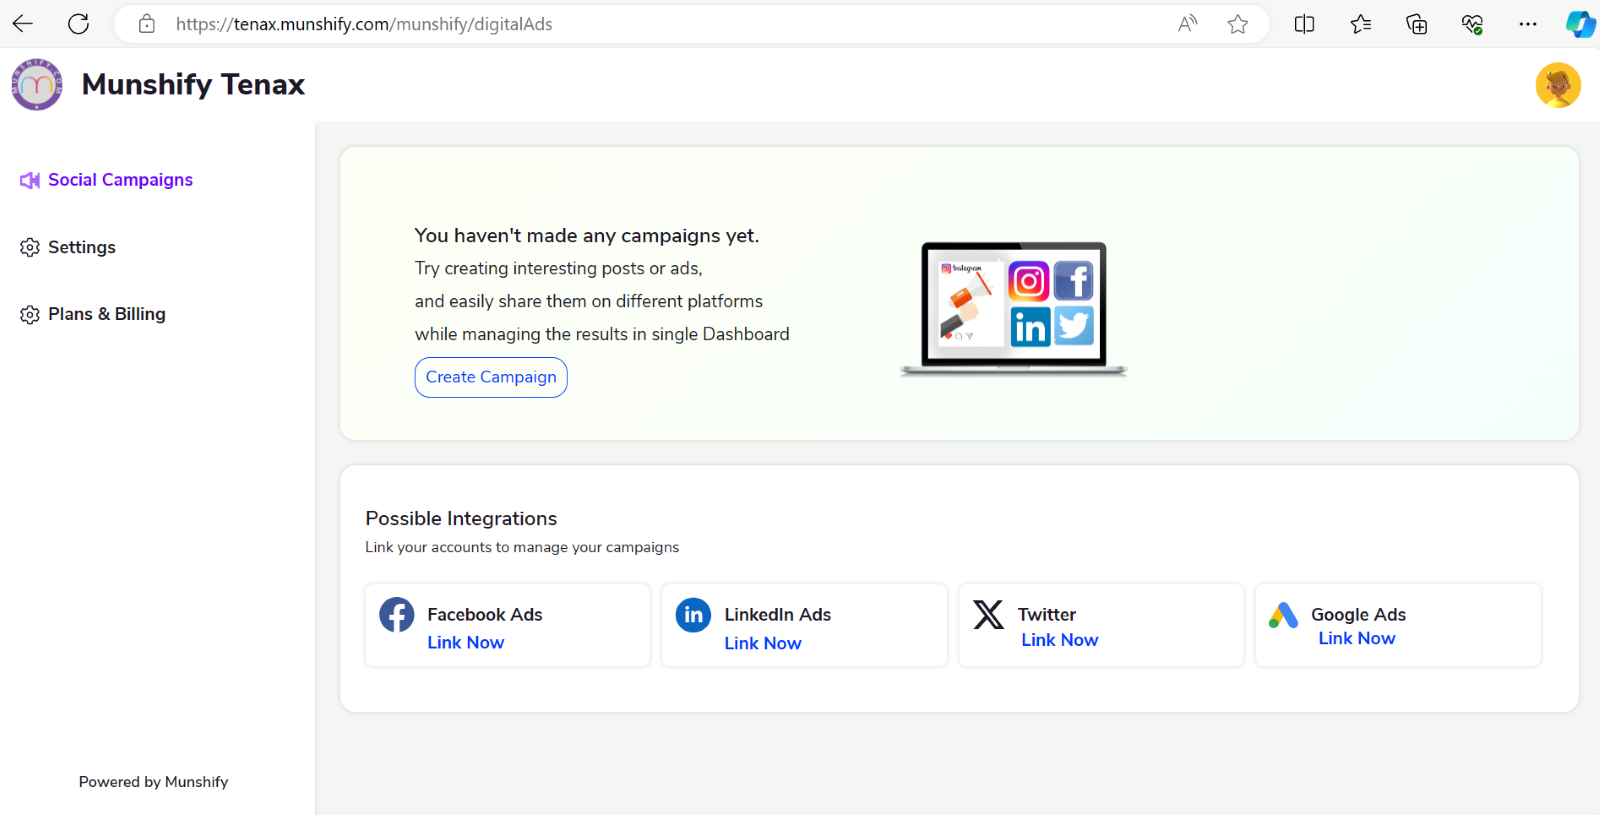
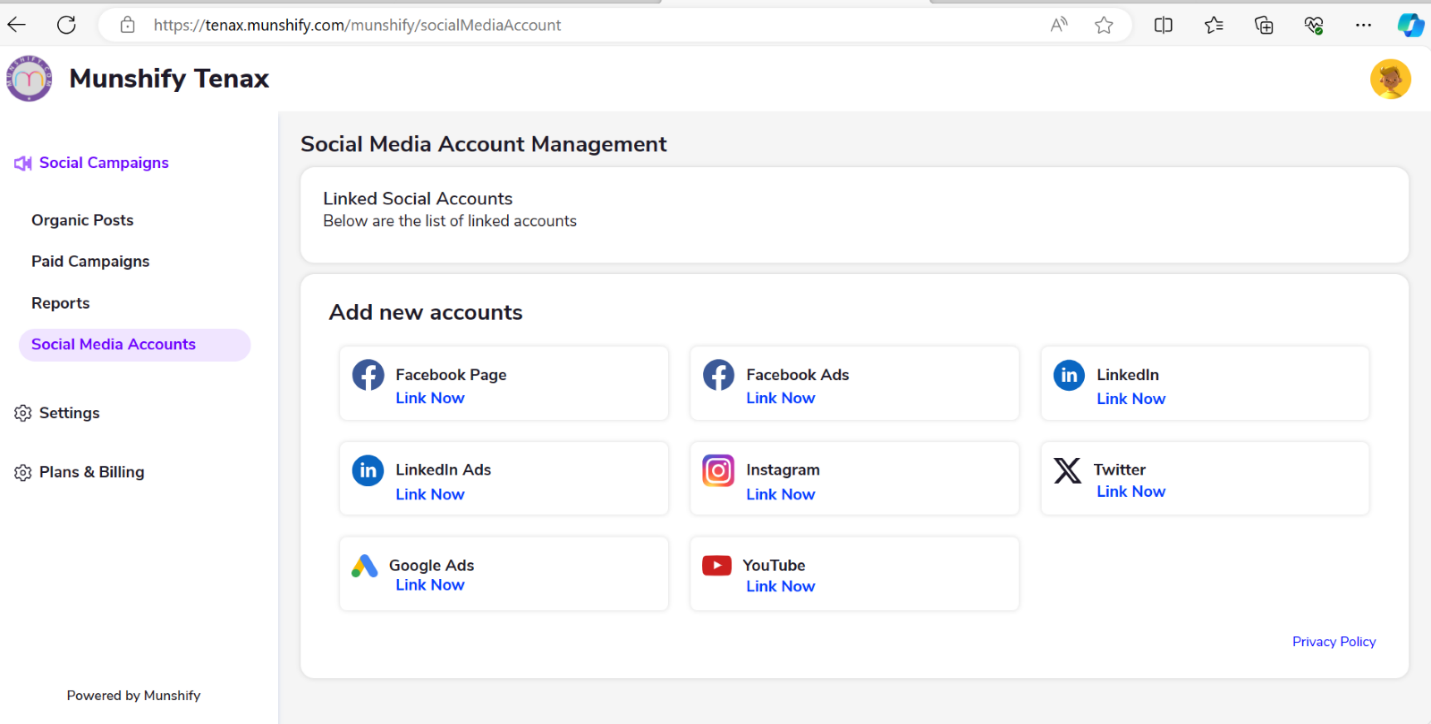
3. Add Social Media Account to TenaX
After logging in, the user will see a list in the left corner of the screen. From this list, User need to select “Social Campaigns”.
3.1 – Introduction
For step-by-step instructions for connecting each type of account:
Note: Only pages from all accounts can be linked together.
Supported Social networks offer diverse account types
Munshify Tenax offers support for different account types, each contributing to your account limit.
Social Network | Supported Account Type |
| Facebook Pages are supported by Munshify Tenax. |
| Instagram Business is supported by Munshify Tenax. |
| LinkedIn Pages (Company, Showcase, or University) |
Add a Twitter Page | Twitter profiles |
Add a Google Ads | Google’s online advertising platform |
Add a YouTube Channel | You Tube channels are supported by Munshify Tenax |


Troubleshooting adding a social account with Munshify Tenax may encounter the following issues:
– Unable to add more accounts despite the plan supporting it:
Members with Team, Business, and Enterprise plans should ensure they are adding accounts to their Munshify Tenax organization rather than for personal use.
– The account I’m trying to add is currently owned by another user:
A social media account can only connect to one Munshify Tenax account at a time. If the account you’re trying to add is already linked to another Munshify Tenax account, you’ll encounter the error message, “This social network is currently owned by another user.” You’ll then be prompted to Take Ownership of the account.
If the account is associated with a Munshify Tenax organization, claiming ownership is not possible. You may see a message displaying the name of the organization that currently owns the account, or encounter the message, “You don’t have access to this social network” when attempting to claim ownership. In such cases, contact Munshify Support for assistance.
3.2 - Add a Facebook Page

Streamline your social media management by adding your Facebook Page to Munshify Tenax. With this integration, you can effortlessly publish content, engage with your audience, access analytics, and perform various other tasks—all from a single, unified dashboard.
Note: Due to several changes by Facebook in 2018 to protect user privacy, publishing is not supported for Facebook personal profiles.
To add social accounts to Munshify Tenax organizations, you require super admin, admin, or custom Add social networks permissions for your Munshify Tenax organization. For more information, refer to Managing your organization’s social accounts.
Preparation Steps Before Adding Facebook Pages to Munshify Tenax
For Facebook Pages, follow these steps:
Verify that your Facebook account holds a Page role of Admin or Editor for classic Page types, or Facebook access with full or partial control for new Page types. For detailed instructions, refer to the Manage Page Settings section in the Facebook Help Center.
Additionally, if your Page is within Business Manager, ensure two-factor authentication is enabled for your Facebook account (see the Facebook help on Turning on Two-factor Authentication for Business Manager).
To add a location Page, ensure that your Facebook account holds the appropriate Page role directly on the location page. Please note that due to a limitation on Facebook’s end, Munshify Tenax cannot recognize role permissions inherited from the parent page.
Logging to Facebook
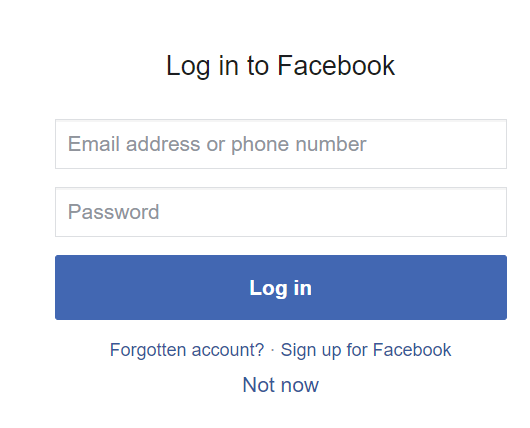
Upon logging in, you’ll have the opportunity to choose which pages Munshify can access. Your privacy and control over your data are important to us, so we want to ensure you’re comfortable with the level of access granted.

Options for Access:
- Opt-In to All Current and Future Pages:
By selecting this option, Munshify will have access to your current pages and any new pages you create in the future. This grants Munshify comprehensive access to manage all your pages seamlessly.
- Opt-In to Current Pages Only:
Choosing this option restricts Munshify’s access solely to the pages you select during this process. Munshify will not have access to any pages you create after this selection.
Review and Confirm:

Certainly, here’s a concise explanation of each point:
- “Access your page and app insights”: Munshify wants to see how your Facebook page and connected apps are performing.
- “Manage ads for ad accounts that you have access to”: Munshify wants to help you create and handle ads for ad accounts you’re connected to.
- “Access your Facebook ads and related stats”: Munshify wants to check how well your Facebook ads are doing.
- “Access profile and posts from the Instagram account connected to your page”: Munshify wants to see your Instagram profile and posts linked to your Facebook page.
- “Upload media and create posts for the Instagram account connected to your page”: Munshify wants to post pictures or videos on your Instagram account linked with your Facebook page.
- “Create and manage content on your page”: Munshify wants to help you make and handle posts on your Facebook page.
- “Manage comments on your page”: Munshify wants to help you control and handle comments on your Facebook page.
After making your selection, you’ll have the chance to review and confirm the chosen level of access. We value transparency, and this step ensures you’re fully aware of what Munshify can do with the pages you’ve granted access to.
We’re committed to safeguarding your privacy and ensuring a secure experience with Munshify.
3.3 - Add an Instagram Account

Integrate an Instagram account with Munshify Tenax for publishing, audience engagement, report creation, and additional functionalities.
To incorporate social accounts into Munshify Tenax organizations, you require super admin, admin, or custom permissions for adding social networks within your Munshify Tenax organization. For further details, refer to the section on managing your organization’s social accounts.
To login to Instagram account user need to use the same Facebook login page to sign in to Instagram account
Login to the Instagram account.
Before getting started, it’s important to understand Instagram’s three profile types: Personal, Business, and Creator. For full access to Munshify Tenax’s Instagram features, such as engagement, direct publishing, and analytics, it’s recommended to have a business profile.
Note that Creator profiles are labeled as Business profiles in Munshify Tenax, but they don’t support direct publishing due to Instagram limitations.
You don’t necessarily need an Instagram Business account to connect with Munshify Tenax. However, to utilize all analytics and engagement features, make sure you have:
– An Instagram Business profile linked to a Facebook Page.
– The appropriate permissions on Facebook, depending on the type of Facebook Page you have: Admin or Editor for classic Pages, and full or partial control for new Pages.
Tip: If you have a Personal profile, you can convert it to a business profile and then connect it to Munshify Tenax. The platform will automatically update the connected profile for you.”
Here’s how to add an Instagram Business account to Munshify Tenax:
- Log out of Instagram and Facebook in a separate browser tab or window.
- In Munshify Tenax, go to My profile, then click on Manage accounts and teams.
- For Professional plans, click on + Private account. For Team, Business, and Enterprise plans, click on Manage next to your organization name, then select Add a social network.
- Choose Instagram Business from the options.
- Click on Log in to Facebook.
- Enter your Facebook account credentials, then click Log in.
- Next, select Add next to the Instagram Business profiles you wish to add to Munshify Tenax, and then click Done.
- Opt-In to All Current and Future Pages:
By selecting this option, Munshify will have access to your current pages and any new pages you create in the future. This grants Munshify comprehensive access to manage all your pages seamlessly.
- Opt-In to Current Pages Only:
Choosing this option restricts Munshify’s access solely to the pages you select during this process. Munshify will not have access to any pages you create after this selection.
Choose the Instagram accounts that you want Munshify to access

Certainly! Here’s a short explanation of the options for choosing Instagram accounts that Munshify can access:
- Opt-In to All Current and Future Instagram Accounts:
By selecting this option, Munshify will have access to all your current Instagram accounts, as well as any new Instagram accounts you create in the future.
- Opt-In to Current Instagram Accounts Only:
Choosing this option will limit Munshify’s access to only the Instagram accounts you select at this moment. It will not have access to any Instagram accounts you create after this selection.
Review What Munshify is requesting permission to do

3.4 - Add a LinkedIn Page
Manage your LinkedIn profile or Page conveniently alongside other social media accounts by adding it to Munshify Tenax. When connected, you can publish content, engage with your audience, create reports, and more. Each LinkedIn user can link up to 100 Pages, including Showcase and University Pages.
To integrate social accounts with Munshify Tenax organizations, ensure you have super admin, admin, or custom Add social networks permissions. For more details, refer to Managing your organization’s social accounts.
Before you start, ensure that your personal LinkedIn account holds Super admin status for the Page you’re adding. You’ll use your LinkedIn credentials to grant Munshify Tenax access to your Pages, but adding your personal LinkedIn profile isn’t necessary.
To add a LinkedIn profile or Page:
- Log out of LinkedIn in a separate browser tab or window.
- In Munshify Tenax, navigate to My profile, then click on Manage accounts and teams.
- For Professional plans, click on + Private account. For Team, Business, and Enterprise plans, click on Manage next to your organization name, then select Add a social network.
- Choose LinkedIn from the options.
- Enter your LinkedIn account credentials (email and password), then click Sign in.
- Select Add next to the Pages and profiles you want to connect to Munshify Tenax, then click Done.
- Optional: If a selected Page has access to an ad account, select the ad accounts you want to add to Munshify Tenax, then click Done. This allows you to sponsor your LinkedIn Page posts using Munshify Tenax.

- Permission Request by Munshify Social:
– Munshify Social is requesting permission to perform various actions on behalf of your organization on social media platforms. This includes creating, editing, and deleting posts, comments, and reactions.
- Access to Your Basic Profile Information:
– Munshify Social wants to use your basic profile details, such as your name, photo, headline, and public profile URL, for authentication and display purposes.
- Access to Your Organization’s Social Media Data:
– Munshify Social wants permission to retrieve and analyze data related to your organization’s social media posts, comments, reactions, and overall engagement.
- Management of Your Organization’s Pages:
– Munshify Social requests permission to manage your organization’s social media pages and access reporting data related to page performance.
- Additional Permission for Handling Posts, Comments, and Reactions:
– This paragraph seems to repeat the first point, indicating Munshify Social’s ability to create, modify, and delete posts, comments, and reactions on your behalf.
The final part gives you the option to either cancel or allow the permission request. If you choose to allow, you’ll be redirected to the Munshify Social platform where you can complete the authorization process.
3.5 - Add a Twitter Page
“Integrate your Twitter profile with Munshify to streamline management alongside your other social media accounts. Once connected, you can publish content, interact with your audience, generate reports, and access additional features.
To add social accounts to Munshify organizations, you must have super admin, admin, or custom permissions specifically allowing the addition of social networks within your Munshify organization.”
Sign in to Twitter Account:

To add your Twitter profile to Munshify, follow these steps:
- Log out of Twitter: Open a separate browser tab or window and log out of your Twitter account.
- Access Account Management in Munshify:
– For Professional plans: Navigate to “My Profile” in Munshify and then select “Manage Accounts and Teams.” Choose “+ Private Account.”
– For Team, Business, and Enterprise plans: Click on “Manage” beside your organization name, then select “Add a Social Network.”
- Choose Twitter: Select the option to add a Twitter account.
- Enter Twitter Credentials: Provide your Twitter account username and password, then click “Sign In.”
Note: Using Google or Apple sign-in methods isn’t supported for connecting to Munshify. If you’ve been using these methods, you’ll need to create a password through the Twitter login page by selecting “Forgot Password.”
By following these steps, you’ll successfully add your Twitter profile to Munshify, allowing you to manage it alongside your other social media accounts.
Munshify Wants to access Your X Account


From a user’s perspective, when you encounter a prompt like “Munshify Wants to Access Your X Account,” it means that Munshify is requesting permission to connect with your X account (e.g., Twitter, Facebook, Instagram). Here’s a detailed explanation you can include in your documentation:
“When you see a prompt stating ‘Munshify Wants to Access Your X Account,’ it indicates that Munshify is seeking permission to interact with your X account (replace ‘X’ with the specific platform like Twitter, Facebook, or Instagram). This could involve various actions such as posting content, accessing data, or managing settings on your behalf.
To proceed, you have two options:
- Authorize App: By selecting this option, you grant Munshify permission to access your X account. This allows Munshify to perform the requested actions or integrations related to your account.
- Cancel: Choosing this option declines Munshify’s request to access your X account. If you’re unsure or uncomfortable granting access, you can opt to cancel the request.
It’s important to review the specific permissions requested by Munshify before authorizing access. This ensures that you maintain control over your account’s privacy and security. If you have any concerns or questions about the access request, you can seek further information or assistance before proceeding.”
Things Munshify Social Can View:
– All posts, even from protected accounts: Munshify Social can see all the posts on your social media feed, including those from private or protected accounts.
– Any account, including protected accounts: Munshify Social has the ability to view any account on the platform, including those with privacy settings enabled.
Things Munshify Social Can Do:
– Post and repost on your behalf: Munshify Social can create new posts and repost content on your social media accounts.
– Stay connected to your account until you revoke access: Once you grant access, Munshify Social will remain connected to your account until you manually revoke access.
Munshify Social is developed by Erelego Technologies Pvt Ltd. For more information about how your data is handled, you can read Erelego Technologies Pvt Ltd’s privacy policy and terms.
3.6 - Add a Google Ads
“Adding Google Ads to your account allows you to effectively manage your online advertising campaigns alongside other marketing efforts. With Google Ads integrated into your platform, you gain access to a powerful suite of tools for creating, monitoring, and optimizing your ad campaigns across various Google platforms, including search, display, and video.
Here’s how you can add Google Ads to your account:
- Navigate to Settings: Log in to your account and navigate to the settings or configuration section.
- Find Integrations or Connected Apps: Look for an option related to integrations, connected apps, or third-party services.
- Select Google Ads: Choose the option to add Google Ads to your account from the list of available integrations.
- Authorize Access: You’ll likely be prompted to authorize access to your Google Ads account. Follow the on-screen instructions to grant the necessary permissions.
- Complete Integration: Once authorized, your Google Ads account will be successfully integrated into your platform. You should now be able to access and manage your ad campaigns directly from your account dashboard.
By adding Google Ads to your account, you can streamline your advertising efforts, track performance metrics, and make data-driven decisions to optimize your campaigns for maximum effectiveness.”
This integration allows you to effectively manage your advertising efforts and gain insights into campaign performance without having to switch between multiple platforms.

Certainly! Here’s a detailed explanation of each line from the message you received regarding Munshify Tenax’s additional access to your Google account:
- Munshify Tenax Wants Additional Access to Your Google Account:
– This indicates that Munshify Tenax, a service or application, is requesting further permissions to access your Google account beyond what it already has.
- Munshify Tenax Already Has Some Access:
– This suggests that Munshify Tenax already has some level of access to your Google account for certain services or features.
- See the One Service That Munshify Tenax Has Some Access:
– This option allows you to review the specific service or feature within your Google account that Munshify Tenax already has access to.
- Make Sure You Trust Munshify Tenax:
– This is a reminder to consider whether you trust Munshify Tenax with the additional access it’s requesting to your Google account. It’s essential to ensure the safety and security of your sensitive information.
- You May Be Sharing Sensitive Info with This Site or App:
– This highlights the importance of understanding the potential implications of granting additional access to Munshify Tenax. It’s a reminder that providing access may involve sharing sensitive data with the service or application.
- You Can Always See or Remove Access in Your Google Accounts:
– This assures you that you have control over the access granted to Munshify Tenax, and you can review or revoke this access at any time through your Google account settings.
- Learn How Google Helps You Share Data Safely:
– This provides you with the option to learn more about Google’s security measures and practices for safely sharing data with third-party services or applications.
- See Munshify Tenax’s Privacy Policy and Terms of Service:
– This allows you to review Munshify Tenax’s privacy policy and terms of service to understand how they handle your data and what rights you have as a user.
- Cancel or Continue:
– Finally, you’re given the choice to either cancel the request for additional access or continue and grant Munshify Tenax the requested permissions.
These lines provide important information and options for you to consider before proceeding with granting additional access to your Google account. It’s essential to review them carefully and make an informed decision based on your trust in Munshify Tenax and your privacy preferences.
Munshify Tenax has this access

- Munshify Tenax Has This Access:
– Munshify Tenax has access to your Google account.
- You Can Always Remove Any Access in Your Google Account:
– You have the ability to revoke or remove any access granted to Munshify Tenax in your Google account settings.
- See Edit, Create, and Delete Your Google Ads Accounts and Data:
– Munshify Tenax has permissions to perform the following actions on your Google Ads accounts and associated data:
– Edit existing Google Ads accounts.
– Create new Google Ads accounts.
– Delete Google Ads accounts and associated data.
Granting Munshify Tenax access to edit, create, and delete your Google Ads accounts and data allows the service significant control over your advertising campaigns. You should carefully consider whether you trust Munshify Tenax with this level of responsibility and be aware of the potential implications of granting such access.
If you decide to revoke Munshify Tenax’s access to your Google Ads accounts and data, you can do so through your Google account settings. It’s important to ensure that the access granted aligns with your privacy and security preferences.
3.7 - Add a YouTube Channel
- Adding a YouTube Channel to Munshify:
– You can integrate your YouTube channel with Munshify to manage it alongside your other social media accounts. Once added, you’ll be able to perform various actions such as publishing content, engaging with your audience, and managing subscriptions and playlists.
- Permissions Required:
– To add social accounts to Munshify organizations, you’ll need either super admin, admin, or custom permissions specifically for adding social networks within your Munshify organization.
Certainly! Here’s detailed information on adding a YouTube channel to Munshify Tenax:
- Accessing Your YouTube Channel:
– Begin by logging out of YouTube in a separate browser tab or window.
- Navigating to Account Management in Munshify Tenax:
– If you’re using a Professional plan, navigate to “My Profile” in Munshify Tenax and select “Manage Accounts and Teams.” For Team, Business, and Enterprise plans, click on “Manage” beside your organization’s name, then select “Add a Social Network.”
- Selecting YouTube:
– Choose the option to add a YouTube channel to your Munshify Tenax account.
- Signing in to Your Google Account:
– Sign in to the Google account that owns the YouTube channel by entering your email and password associated with that Google account.
- Granting Access:
– After signing in, select the Google account that owns the YouTube channel and click “Allow” to grant Munshify Tenax access to manage the channel.
- Verification:
– To verify whether your Google account owns a YouTube channel, you can sign in to your YouTube account settings page. Your YouTube channel will be listed there, or you will see the option to create a channel if you don’t have one yet.
By following these steps, you’ll successfully add your YouTube channel to Munshify Tenax, enabling you to manage it conveniently alongside your other social media accounts.
Your Account or a brand account

“To continue to Munshify Social, select your personal account or a brand account associated with your brand or organization. This choice determines which account Munshify Social will be linked to for managing your social media presence.”
Munshify Social Wants Additional Access to your Google Account

- Request for Access: Munshify Social is asking for additional access to your Google Account.
- Trust Consideration: Before granting this access, it’s important to consider whether you trust Munshify Social with your information.
- Potential Sharing of Sensitive Information: Granting access means you might be sharing sensitive information with Munshify Social, so it’s crucial to trust them.
- Access Management: You can manage or remove this access later in your Google Account settings if needed.
- Safety Measures: Google implements safety measures to help you securely share data, and it’s important to understand these measures.
- Review Privacy Policy and Terms of Service: Take the time to review Munshify Social’s privacy policy and terms of service to understand how they handle your information.
We are located at
eReleGo Technologies Pvt Ltd
646, 52, 12th Main Rd,
2nd Block, Rajajinagar,
Bengaluru, Karnataka 560010